Standard Rates - Setting up & Managing Your Rate Plans
Quick Answer: This article covers Standard Rates & Rate Plans in GuestPoint and the Standard Rate Management Screen located in Management > Setup > Standard Rates, Extras & Promotions > Rates Tab
Each room type on GuestPoint has rate plan(s).
A rate plan's Standard Rate is the base nightly rate, which feeds into the Dynamic Rates Screen.
The Dynamic Rates Screen always shows the true, final nightly rate - dynamic rate adjustments are not overwritten by Standard Rate updates.
Recommended workflow: set seasonal/yearly pricing with Standard Rates, then use Dynamic Rates for one-off adjustments (weekends, holidays, events).
What are Standard Rates & Rate Plans?
The Standard Rates section of GuestPoint is where you set up and manage your rate plans on GuestPoint.
Rate Plan - Every room type on GuestPoint has at least one rate plan that determines the nightly rates for any bookings you make on GuestPoint and any online platforms through the channel manager.
Rate plans can be set to Offline (manual usage only) or Online (available to be booked online when mapped).
A rate plan controls the following features on GuestPoint
1. Standard Nightly rate
A rate plan controls the following features on GuestPoint
1. Standard Nightly rate
2. Minimum Nights required to book
3. How many guests are included in the rate plan
4. Applicable Extra Guest Charges when the guest count goes above the Guest Included number
5. Any Extras that are Inclusive of a Rate Plan - this is how inclusive rate plan packages are set up.
A common question is what the difference between a Standard Rate and a Dynamic Rate is on GuestPoint.
Standard Rate - A Standard Rate on GuestPoint refers to the base nightly rates of a rate plan. Dynamic rate adjustments act on these base rates.
You can set different standard nightly rates for different date periods.
The last set date period will always go until infinity (No Expiry).
Dynamic Rates are then manual rate adjustments to the ongoing standard rates.
Dynamic rate adjustments can be done in Management > Setup > Dynamic Rates & Online Inventory > Dynamic Rates tab.

Regardless of if you control your rates with Standard Rates or Dynamic Rates, the true nightly rate GuestPoint uses for online and offline bookings the current nightly rate you see in the Dynamic Rates Screen.
Our recommended approach to controlling nightly rates on GuestPoint is to first set your yearly/seasonal rates up with Standard Rates, and then apply any special dynamic rate adjustments (like Special Events or Public Holidays or Weekends) with Dynamic Rates.
Every Room Type requires one Default Rate Plan
On GuestPoint, each room type has a default rate plan often referred to as the "Standard Rate Plan" as it is the main rate plan used for any manual bookings you make on GuestPoint. These are usually your direct booking rate i.e. your Walk In prices.
Other systems may call our default rate plan names like "Standard Rate" or "Best Available Rate", these all refer to the standard rate plan you use to map to their platform.
The rate plan on GuestPoint that you use for mapping to your channel manager could be the default standard rate plan or another separate OTA-specific only rate plan.

You do not necessarily need a separate rate plan to control OTA pricings - more information available towards end of article in Advanced Channel Manager Tips
You can see what each room type's default rate plan by the Green Tick in the Preferred Column.
You can have multiple rate plans for a room type, but every room type must have one default rate plan as a GuestPoint requirement.
How to Navigate Standard Rates Screen (Filtering & Sorting Options)
1. Creating a Rate Plan
To create a new Rate Plan, click into the + New Rates and Packages button located at the top right corner of the Rates tab.
Management > Setup > Standard Rates, Extras & Promotions > Rates tab > + New Rates and Packages
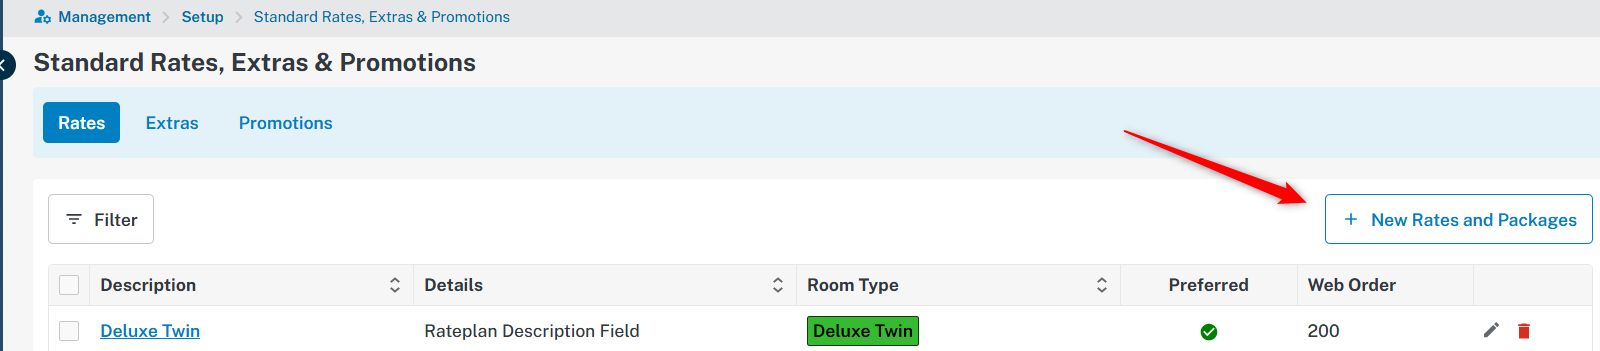
Management > Setup > Standard Rates, Extras & Promotions > Rates tab > + New Rates and Packages
2. Editing a Rate Plan
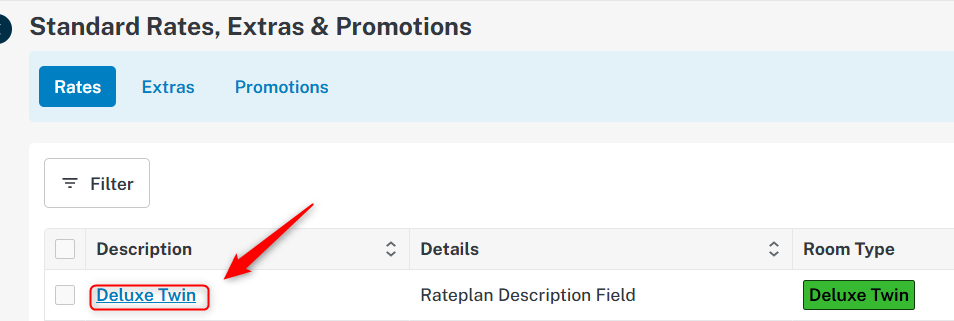
You can edit an existing rate plan by clicking into the description name with the blue link.
3. Editing Multiple Rate Plans
Multiple rate plans can be edited at the same time by ticking the left checkbox of the desired rate plans and proceeding to Multiple Edit button on the right.
4. Changing the Sorting Order
You can sort rate plans alphanumerically by clicking on the column header of 3 applicable sorting columns:
- Description
- Details
- Room Type
The currently active sorting column type is indicated by a blue highlighted colour on the column.

By default, the Standard Rates Management Screen sorts alphabetically by Room Type followed by alphabetical Description
5. Changing the Number of Rate Plans Shown On 1 Page
If you have a long list of rate plans, they will start to be collected on multiple pages on the bottom right corner.
On the bottom left corner, you can change how many rate plans are shown on 1 page. You can choose from 15, 30, or 50, and 15 rate plans is the default setting.
6. Filtering Options
Clicking into the Filter button will offer you the following filter options:
- Room Type
- Publish Location (Not Online, Own Website, External Website, All)
- Inactive Rates
7. Deleting a Rate Plan
You can delete a rate plan by clicking the red Trash Can icon.
However, rate plans which have been historically used on the GuestPoint system cannot be deleted.
You will receive the below error if you try to delete these type of rate plans.
8. Making a Rate Plan Inactive
You can make a rate plan inactive by clicking into the rate plan and ticking the Deactivate Rate checkbox and saving.
This feature is not available for any default rate plans (indicated by a green tick in the Preferred column).
Please note that making a rate plan inactive on GuestPoint when it is currently mapped to online platforms does not necessarily mean it will be unavailable to book on online platforms like the GuestPoint Booking Engine and any OTAs connected to your channel manager.
You usually need to delete/deactivate the rate plan ON the online platform first before doing this step on GuestPoint.
You usually need to delete/deactivate the rate plan ON the online platform first before doing this step on GuestPoint.
9. Hiding a Redundant Rate Plan for Room Types No Longer In Use
If your purpose is to "Hide" certain rate plans that belong to redundant room types no longer in the system so that your Dynamic Rates Screen is cleaner, GuestPoint Support can help assist with this depending on your scenario.
This scenario will apply to you if you cannot delete the last default rate plan belonging to a redundant room type because the rate plan is in use and cannot be deleted.

If this applies to you, please contact GuestPoint Support to initiate the process to hide the redundant rate plan.
Creating a New Rate Plan or Editing An Existing Rate Plan
The setup/edit screen for a new or existing rate plan is the same.
This section describes each field of the rate plan set-up screen and what they do.
Start by either creating a new rate plan or editing an existing rate plan.
1. New Rate Plan - Click into the + New Rates and Packages button on right-hand side
2. Edit Existing Rate Plan - Click into the blue rate plan name in the Description column
3. Edit Multiple Existing Rate Plans - To edit multiple rate plans, tick the checkboxes on the left column for applicable rate plans and click into the new Multiple Edit button that would appear on the right-hand side of screen.
Rate Plan Set Up Screen
After proceeding to create or edit a rate plan, you will see below rate plan setup/edit screen.

There are a few mandatory fields that must be filled out before creating a rate plan or saving an edit to a rate plan.
These mandatory fields are marked with a red * asterik in the rate plan screen.
SECTION 1 - Rate Descriptions
1. Description - The name of the rate plan
It influences the following areas on GuestPoint:
1. What the default room charge Description is when nightly rates are posted on a Room Account by Roll Over or Check In process.
1. What the default room charge Description is when nightly rates are posted on a Room Account by Roll Over or Check In process.
2. As a result, this influences what Description guests see for the room charges on their Room Account Invoice or Debtor Invoice
3. This field also controls the rate plan name in the Dynamic Rates Screen
2. Web Description - This field is only relevant to for our GuestPoint Booking Engine. It controls what the front-end booker sees as the rate plan name.
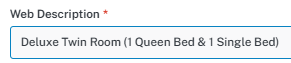
If not using our booking engine, simply copy-paste the same Description into this field as it is a mandatory field.
3. Room Type - What room type this rate plan is attached to.
Due to system limitations, you cannot change the attached room type of an existing rate plan (this field will be greyed out).
You can only select the room type when you are making a new rate plan.
You can only select the room type when you are making a new rate plan.
4. Publish To - This is an important field that determines the nature of your rate plan whether it is Offline (for manual bookings only) or Online (to further map onto online platforms through a channel manager).
There are 4 options for Publish Location:
- Not Online - The rate plan can only be used manually for manual bookings on GuestPoint.
- Own Website - This option is only relevant for clients using our GuestPoint Booking Engine.
Enabling this option makes the rate plan bookable on the GuestPoint Booking Engine. - External Website - This rate plan will not push to the GuestPoint Booking Engine, but will be available to be used for mapping on channel managers.
- All - This rate plan will push to the GuestPoint Booking Engine and also be available for mapping with channel managers.
If you are not using the GuestPoint Booking Engine, the only two relevant publish locations would be Not Online and All.
Setting a rate plan to 'Not Online' simply means the rate plan stops providing rates & restrictions to any mapped platforms through a channel manager.
It does not push a stop sell to those platforms even if you set the rate plan to 'Not Online', nor does it unmap itself from the channel manager to those platforms.
If you truly wish to make the rate plan unavailable on the platforms connected to the channel manager, you need to deactivate or delete that specific rate plan from being offered on that platform's Extranet before you come back to GuestPoint to set it to 'Not Online'.
You may also apply a stop sell on the rate plan for 2 years before you set it to 'Not Online'.
You may also apply a stop sell on the rate plan for 2 years before you set it to 'Not Online'.
5. Channel Manager Code - Nowadays this is only an internal reference field unless you are using the ResOnline Channel Manager or the UseRoss Channel Manager.
This field is mandatory for these two channel manager integrations to work.
If you are using SiteMinder as a channel manager, you can put in the SiteMinder rate code here for internal reference.
However, this section is not what controls the actual rate code we are using for the GuestPoint >< SiteMinder connection.
6. Default Rate for this room type - This controls the default rate plan that is selected every time you make a manual booking on GuestPoint.
Every room type on GuestPoint requires one default rate plan to function properly.
Typically this option is ticked for your main standard rate plan for the room type.
Whatever rate plan you would use for Walk Ins or Telephone Bookings or Email Bookings should be set as the default rate plan.
7. Default Group Rate for this room type - This controls the default rate plan selected every time you make a Group Reservation booking on GuestPoint. Optional setting.
8. Deactivate Rate - You can set a rate to be inactive and this hides it from being able to be selected as a rate plan for a booking, and also hides it in the Standard Rates Management Screen and the Dynamic Rates Screen.
Similarly to the "Not Online" setting, deactivating a rate plan does not necessarily mean it is removed from all bookable platforms where the rate plan is currently mapped. Deactivating a rate would only mean the rate plan will stop providing rates & restrictions to any mapped OTA rate plans on the channel manager.
9. Web Sort Order - A very useful field that is somewhat misleading with the name.
Web Sort Order can actually control the sorting order of your rate plans on the Dynamic Rates Screen from top to bottom.
You should make use of Web Sort Order if you frequently manage rates often from the Dynamic Rates Screen and find yourself getting confused often, or you prefer a neat tidy sorting order of your preference to help you be more efficient.
You should make use of Web Sort Order if you frequently manage rates often from the Dynamic Rates Screen and find yourself getting confused often, or you prefer a neat tidy sorting order of your preference to help you be more efficient.
The sorting order starts from 0 and can go up to 999, with sorting orders starting from 0 appearing first at the top of the Dynamic Rates Screen.
Web Sort Order number 999 would appear last at the bottom of the Dynamic Rates Screen.
10. Details - Description of the rate plan and what it offers. This field appears in following internal and external locations on GuestPoint:
- Internally - The Details column of Standard Rates Management Screen.
- Externally - Manual Booking Confirmations sent from GuestPoint.
- Externally on GuestPoint Booking Engine - What the front-end booker sees as the rate plan description.
It is recommended you make this a short summary of what the room type includes and what the rate plan includes (i.e. amenities like Free Parking and Free Wi-Fi and how many guests included are in the rate, and if any extra guest charges apply).
SECTION 2A - Rate Periods
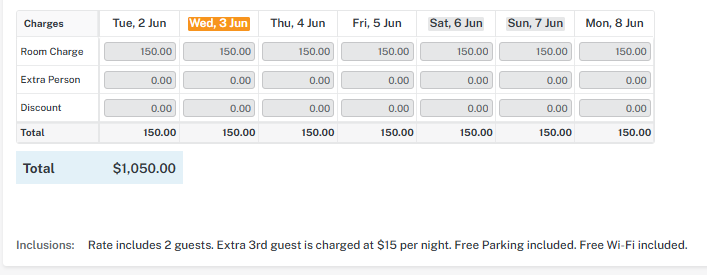
This section is where you set a standard nightly room rate for the rate plan.
Your rate plans on GuestPoint will initially feed a standard rate from here to the Dynamic Rates Screen.
What displays on the Dynamic Rates Screen is the true nightly rate that is being used by the GuestPoint system.
You can input different rates for different date periods to create a yearly/seasonal pricing effect. The last date range will always be valid until infinity (No Expiry End Date).
While you can use Dynamic Rates all the time to adjust your rates, we recommend you always start off with a standard rate inputted here before you move onto Dynamic Rates.
Dynamic Rates should only be used for specific dates or days of the week where you need the rate to be different to the standard rate you have inputted.
Dynamic Rates should only be used for specific dates or days of the week where you need the rate to be different to the standard rate you have inputted.
EXAMPLE SCENARIO - You want increased pricing on Friday & Saturdays.
You should first set a standard rate for the rate plan before applying a bulk Dynamic Rate Update targeting all Friday & Saturdays for this rate plan.
COMMON ISSUE - You update the standard rate but that rate update is not carrying across to online platforms.
When you update a Standard Rate of a rate plan, this will only update dates where a nightly dynamic rate has not been previously applied before.
Cross-reference the current rate displaying in Dynamic Rates Screen (Management > Setup > Dynamic Rates & Online Inventory) and see if it matches the standard rate you have inputted for the same date periods.
TIP - Easiest Way to identify what is a Standard Rate and a Dynamically Adjusted Rate on Dynamic Rates Screen
On the Dynamic Rates Screen, use the colour of the cell box of the nightly rate to determine what is a dynamically adjusted rate and what is a standard rate.
White Cell Box Background - The rate is feeding from the Standard Rates
Light Blue Cell Box Background - A dynamically adjusted rate. Updates to the Standard Rates will not overwrite this cell box.
HOW TO RESOLVE
Use a Bulk Rate Update on the Dynamic Rates Screen and use the "Reset rate to standard rate" option after selecting your date range, rate plan, and specific days of the week.
HOW TO RESOLVE
Use a Bulk Rate Update on the Dynamic Rates Screen and use the "Reset rate to standard rate" option after selecting your date range, rate plan, and specific days of the week.
Apply your changes and you should observe the Cell Box background change from Light Blue (Dynamically Adjusted Rate) to White (Standard Rate).
IMPORTANT - Before you action this Bulk Rate Update, note down any special dates where rates should be higher like Public Holidays or Special Local Events. You will most likely want to keep these dynamic rates.
SECTION 2B - Minimum Nights Stay, Guest Included, Extra Guest Charges
Rack Rate - The definition of a rack rate is vague for everyone. In GuestPoint, the rack rate is not what controls the nightly rate.
It is more of an internal reference rate and is related to our Web Safety Limit feature that prevents accidental rate updates to be published
Example of Web Safety Limit feature - You accidently miss a 0 when you are dynamically updating a rate to $200 and input $20 instead.
The Web Safety Limit can help provide a fallback and publish $150 instead to online platforms if your rate plan rack rate is $200 and your Web Safety Limit percentage is 75%)
Besides internal reference usage, the only internal location a rate plan rack rate shows is in the Dynamic Rates Screen.
It is the reference rack rate that sits right next to the Rate Plan Name.
Minimum Nights - The default number of nights required for this rate plan and what will be sent to online platforms connected with a channel manager.
Minimum nights inputted here will feed to the Dynamic Rates Screen as a standard minimum night value.
You can dynamically update minimum nights as needed.
You can dynamically update minimum nights as needed.
Please Note: Similar to standard rate updates, updates to the minimum nights in the standard rate plan will not overwrite any already existing Dynamic Rate Updates where the minimum night has been adjusted before.
Guest Included - How many guests are included in the nightly rate of this rate plan.
This option is required if your room type or rate plan has any extra guest charges (i.e. a Queen & Single Room Type with 2 guests included).
Extra Adult & Extra Child - Related to Guest Included field, input the extra guest amount for an adult or child that will automatically apply for manual bookings on GuestPoint or when guests are booking on your GuestPoint Booking Engine.
Extra Adult & Extra Child - Related to Guest Included field, input the extra guest amount for an adult or child that will automatically apply for manual bookings on GuestPoint or when guests are booking on your GuestPoint Booking Engine.
If there are no differences between adult or child, input the same amount for both Adult & Child fields.
The Guest Included and Extra Guest Charges setting on GuestPoint does not usually practically carry over to any connected OTAs with a channel manager unless it is our GuestPoint Booking Engine.
Whether this setting carries over or not is dependent on the OTA of concern, what pricing model they are using (Room-Based Model or Occupancy-Based Model), and the channel manager you are using.
Whether this setting carries over or not is dependent on the OTA of concern, what pricing model they are using (Room-Based Model or Occupancy-Based Model), and the channel manager you are using.
For example, this setting would not carry over to a Booking.com account that is on a Room-Based Pricing Model (most common pricing model).
You would need to set up your Extra Guest charges on the Booking.com Extranet instead.
We always recommend you try to book your property as a guest on the front-end to verify if your extra guest charges are working on that specific OTA platform.
We always recommend you try to book your property as a guest on the front-end to verify if your extra guest charges are working on that specific OTA platform.
Override Room Charge - Determines what revenue transaction account the nightly rates will fall under when the nightly room charges are posted by GuestPoint from Roll Over process or Check In process.
This field is next to the "Extra Adult" and "Extra Child" fields and has nothing to do with these fields.By default, GuestPoint will route to the default Room Charges transaction account.
You can change what the default Room Charges account GuestPoint posts to if required in Management > Setup > Transaction Accounts > Settings Section)
It is recommended to leave this field on the default selection "Please Select" unless you truly need to route the Room Charge to a different transaction account.
An example scenario could be you wish to route the accommodation charges of a packaged rate plan under a "Package Accommodation" revenue account instead of the usual "Room Charges" revenue account used for normal bookings.
An example scenario could be you wish to route the accommodation charges of a packaged rate plan under a "Package Accommodation" revenue account instead of the usual "Room Charges" revenue account used for normal bookings.
Inclusion - Any amenities included (like Free Parking or Free Wi-Fi), or Guest Included & Extra Guest Charges information should be written here.
This section appears internally and externally on GuestPoint in following areas:
1. Internally on Reservation Screen - On a booking's Reservation screen, you can see the same Inclusion section just underneath the nightly rates section
1. Internally on Reservation Screen - On a booking's Reservation screen, you can see the same Inclusion section just underneath the nightly rates section
2. Externally on a Manual Booking Confirmation sent from GuestPoint
3. Externally on the GuestPoint Booking Engine during the booking process.
4. Externally on a GuestPoint Booking Engine guest confirmation email.
Cancellation Policy - The Cancellation Policy relevant to this rate plan.
This section is actually only relevant for Manual Booking Confirmations as it is the only external area where it shows on GuestPoint.
If left blank on a rate plan, the Cancellation Policy you input on a property-level will be used (Property-Level Cancellation Policy is located in Management > Setup > Property > Property Details tab > Web Details > Useful Information > Cancellation Policy section)
Common Misconceptions about Rate Plan Cancellation Policy
1. If you are using our GuestPoint Booking Engine - the Cancellation Policy our Booking Engine uses does not come from here but instead the policy the rate plan is attached to.
To review Policies: Management > Booking Engine > Booking Engine Configuration > Policies tab
To see what Policy is attached: Management > Booking Engine > Room Types & Rate Plans > Rate Plans tab > Click into a rate plan and it is under Rate Plan Policy next to "Publish To")
2. Assuming that the Cancellation Policy carries over to OTA platforms where the rate plan is mapped to - Cancellation policies on OTAs feed from the OTA settings themselves and not GuestPoint.
SECTION 3 - Inclusive Extras & Rate Plan Packages
The last section of the rate plan set up screen 'Room Rate Includes' relates to our Extras feature on GuestPoint.
Here you can select certain Extra Items to include in the rate plan to create a packaged rate plan.
We recommend you add details regarding your inclusive extra in the "Inclusion" section box as well for better internal and external transparency.
The Inclusion section can show internally on a Reservation screen or externally on a GuestPoint booking confirmation or the GuestPoint Booking Engine.
There are three main use cases for a rate plan package set-up mainly related to internal accounting benefits:
1. Better Internal Accounting on GuestPoint In General - you wish to separate revenue into Accommodation component and the inclusive extra component.
For example, if you have a negotiated rate with an entity where they pay a nightly rate of $250 that includes $200 Accommodation and $50 Dinner, you can set the nightly rate to be $250 and the inclusive Extra to be $50.
When this rate plan package is used on GuestPoint, it will separate the Accommodation and Dinner revenue to their appropriate accounts.
(On a Room Account Invoice or Debtor Invoice, these two transactions would amalgamate into 1 single line for shorter invoices as well)
2. Allocating your inclusive extra as a "Future Charge" is too time-consuming or error prone - Without an inclusive extra set-up, the only way to properly account for Extras is to allocate them manually as Future Charges to a booking.
In this same example, you might set a nightly rate of $200 just for Accommodation and allocate the $50 Dinners as Future Charges. However, this takes too much time for you and is prone to mistakes. You can look at switching to an inclusive extra set-up instead.
3. Niche Case - Your standard rate always has Breakfast included and you are also using rate plan for mapping with OTAs with your channel manager, but you want to properly account for this revenue back on GuestPoint (or pull a report in general for how many Breakfasts you need to prepare in advance).
This is similar to point 1 but for an online booking only context where bookings are coming from your channel manager.
Invoicing Differences for Rate Plan Packages (or inclusive extras as part of a rate plan)
Do not use Inclusive Extras if your objective is for a clear line-by-line breakdown of your room charge and your extra item on Room Account Invoices or Debtor Invoices.
Do not use Inclusive Extras if your objective is for a clear line-by-line breakdown of your room charge and your extra item on Room Account Invoices or Debtor Invoices.
This is because Inclusive Extras, while they do separate from the accommodation component on a Room Account, the accommodation transaction line and inclusive extra line will amalgamate into one singular line on the Room Account Invoice or Debtor Invoice.
If your invoicee must see the breakdown of accommodation & inclusive extra, you should only use Extras manually or allocate them as Future Charges.
Advanced Rate Plan Set Up - Controlling Direct Booking Rates and OTA Rates
Properties may choose to make their Direct Booking/Website Rate their default rate plan and choose to create another separate rate plan for OTAs to map through a channel manager.
This dual rate plan set up option are for properties who would like complete control over the nightly rates & restrictions of their OTA rate plans.
If you have a specific date ranges where you would like to be unbookable on OTAs and only bookable on your direct websites, you can place a stop sell on the OTA rate plan to achieve this effect.
Advanced Rate Plan Set Up - Marking Up OTA Rates through the Channel Manager
A dual rate plan set up is NOT REQUIRED if you simply want to make your OTAs prices higher than your direct booking rate at all times.
You would do this mark-up to offset the commission expense from the OTA itself.
This set up is more popular over a dual rate plan set up as it is easier & more time-efficient to update one singular rate plan over two rate plans.
It can be done with channel manager multipliers/amount adjustments on an OTA-level where the multiplier/amount adjust you input for the OTA automatically applies to the mapped GuestPoint rate plan.
Properties commonly apply a 15% multiplier to Booking.com to try and offset the ~15% commission Booking.com takes.
The only downside with this option is you cannot control the restrictions of the rate plan. I.e., you cannot stop sell your OTA rate plans without stop selling your direct booking rate plan at the same time.
Related Articles
Promotions - Setting Up & Managing Promotion Codes
Quick Answer: This article covers Promotion Codes in GuestPoint. Promotion Codes can be used manually on GuestPoint for direct bookings, or integrated with our official GuestPoint Booking Engine. Our Promotion Code feature is very simple and only ...Dynamic Rates & Online Inventory
Dynamic Rates & Online Inventory Quick Answer: Open the Dynamic Rates screen to adjust nightly rates. Changes publish to all connected channels automatically. This screen is where you manage your nightly rates and control how many rooms are available ...Web Setting - Auto Stop Sell/Web Rate Safety Limit
Features in GuestPoint to assist you with the web rate and automatic stop-sell. Web Rate Safety Limit is used to avoid publishing any web rates lower than the percentage of your rack rate. There are instances that rates can be accidentally changed in ...Extras - Extra Charge Items, Future Charges, and Including Extras in Rate Packages
Quick Answer: This article covers Extras in GuestPoint. Extras are charges with a pre-set amount that you can attach to a reservation as a Future Charge or to quickly manually add as a charge item. They can also attached to a rate plan as an ...Changing a Room Type or a Room Number
Quick Answer: A change to an existing room type or room number may or may not require manual action from GuestPoint Support. 1. Room Number Changes - You can action this yourself. 2. Room Type Changes for an Existing Room - GuestPoint Support will ...