Invoice Reversal with Partial Payment - When there is no Delete/Reverse button in Current Transactions
Invoice Reversal with Partial Payment
Quick Answer: This article covers invoice reversal with partial payment in GuestPoint.
This procedure applies to invoices sitting in Current Transactions that do not have a Reverse/Delete button available.
These buttons disappear when a partial payment has been applied for the invoice.
This procedure applies to invoices sitting in Current Transactions that do not have a Reverse/Delete button available.
These buttons disappear when a partial payment has been applied for the invoice.
Below are the steps in correcting or reversing of a partially paid invoice sitting in the Current Transactions tab of a debtor account that does not have a Reverse button/Delete button.
This correction/reversal process involves two main manual processes:
1. Creating an opposing invoice that will cancel out the financial effect of the original invoice.
This correction/reversal process involves two main manual processes:
1. Creating an opposing invoice that will cancel out the financial effect of the original invoice.
2. Re-creating a new invoice with your adjustment charges (if the original invoice's charges were incorrect), or re-creating a new invoice with the charges matching the original invoice (if the what you did was an accidental payment on the original invoice)
Below Processes 1 & 2 will showcase an example scenario for an outstanding invoice of $260 where I have accidently selected the wrong payment type during a partial payment of $60 for the debtor.
I have selected Bank Transfer instead of MasterCard, but I need the payment type of $60 to show correctly on the invoice for the debtor's reference, as $200 will still be outstanding.

If you are looking to reverse a paid off invoice sitting in Past Transactions section of a Debtor Account, please refer to below article instead.
Both scenarios are very similar and require manually-intensive processes.
Before Starting Process 1, Verify this is a Partial Payment Invoice Scenario
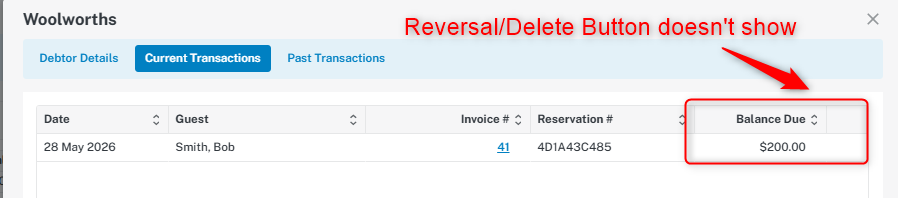
1. First, confirm if you are dealing with a partially paid invoice.
Partially paid invoices from the Current Transactions in the debtors account will not have the Reverse Button or Trash Bin Button beside the Balance Due.
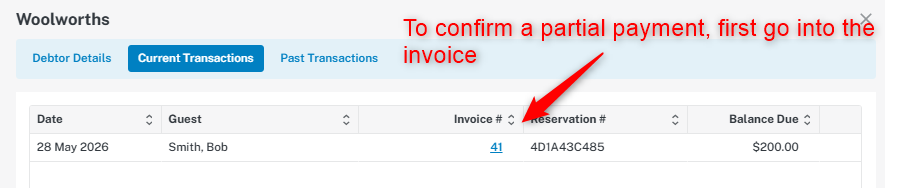
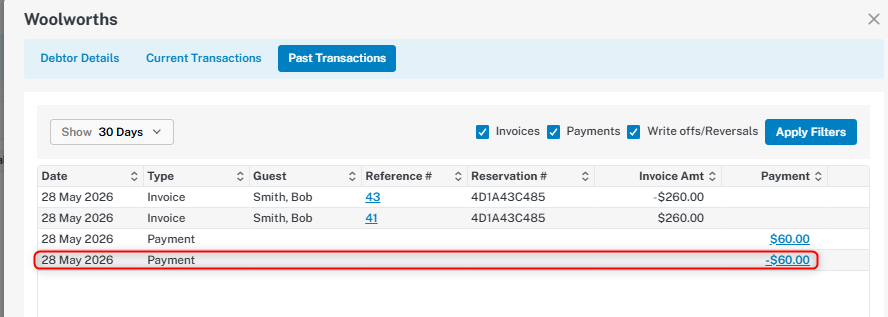
2. The partial payment amount can be confirmed by going into Past Transactions and cross-referencing that payment with the partial payment currently within the invoice.
2. The partial payment amount can be confirmed by going into Past Transactions and cross-referencing that payment with the partial payment currently within the invoice.
Follow below visual steps to confirm a partial payment.
VISUAL STEP 1
VISUAL STEP 2
VISUAL STEP 3
VISUAL STEP 4
PROCESS 1 - Creating an opposing invoice to cancel out the original invoice
1. After confirming a partial payment, we can begin Process 1 which involves creating an opposing invoice to cancel out the financial effect of the original invoice.
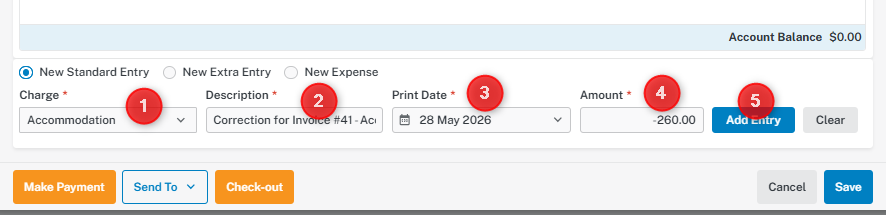
Go back to the original reservation and post a bulk revenue charge with a negative value.
Go back to the original reservation and post a bulk revenue charge with a negative value.
Add in the description that the charge is a correction for the related invoice.
The Print Date does not matter in this case, you can leave it as Today's Date.
Your debtor will not see this correction invoice, so any additional information you put in here is purely for internal reference.

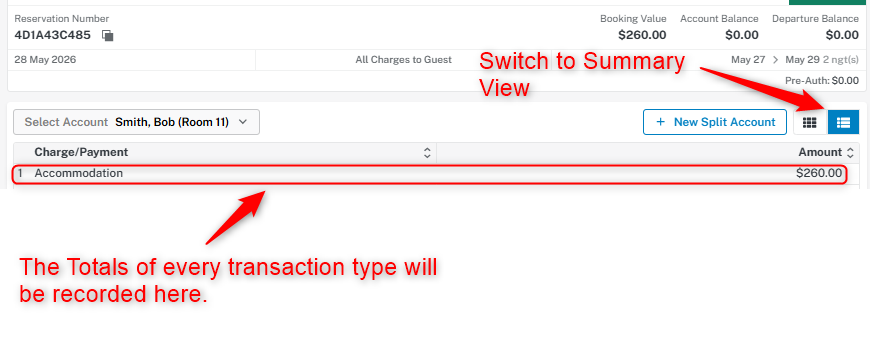
TIP - If your Room Account is either too long of a list with too many transaction lines, you can switch to a Summary View to
obtain the total figures of each transaction type.
obtain the total figures of each transaction type.
The Summary View collects all transactions within the account whether they are invoiced or not.
You can use this Summary View to help you determine the actual negative figure you need to post.
You can use this Summary View to help you determine the actual negative figure you need to post.
Cross-reference this figure with the original invoice to be double-sure.
Alternatively, you can mirror the original invoice and post each negative room charge one by one, but this is a time-consuming
method and not required.
method and not required.
2. After adding your negative charges, proceed to sent all negative charges to the same Debtor Account with your partial payment invoice.
If you have a Company Debtor, it will be "Send to Debtor Account", if you have an Agent Debtor, it will be "Send to Agent Account"
If you have a Company Debtor, it will be "Send to Debtor Account", if you have an Agent Debtor, it will be "Send to Agent Account"
3. Navigate back to your Debtor Account and you should see both the partial payment invoice (#41) and the correction invoice (#43) that you just sent.
4. Proceed to Make Payment
Select both your partially paid invoice and the correction invoice.
Do not edit the payment amounts. If you have done this correctly, the default amount that populates will be the correct Payable amount.
Select your payment type. Match the payment type to the partial payment type.
Do not edit the payment amounts. If you have done this correctly, the default amount that populates will be the correct Payable amount.
Select your payment type. Match the payment type to the partial payment type.
Add a description clarifying that this payment is a correction payment for the partially paid invoice #41
You will notice that the Payable amount (above the Save Payment button in bottom right) should be a negative amount matching the partial payment.
Once you confirm the amount is a negative amount matching the partial payment, proceed to Save Payment
Do NOT proceed with Save Payment if the Payable amount isn't a negative amount matching the partial payment.
Contact GuestPoint Support for further assistance.
Contact GuestPoint Support for further assistance.
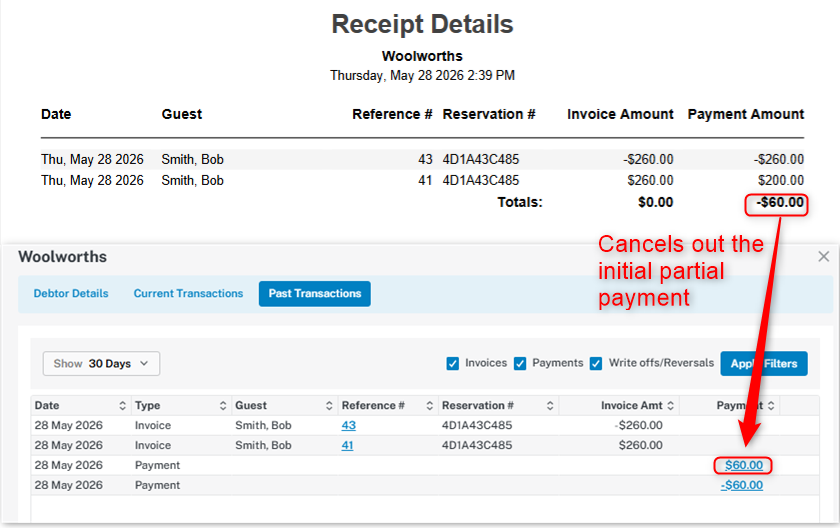
5. Once you have saved the payment, both invoices will flow to Past Transactions tab of the debtor.
Both invoices will have correcting amounts if you open them.
Both invoices will have correcting amounts if you open them.
If you click into the -$60 Payment amount below, you will see both invoices with the Invoice Amount perfectly balanced, and you should have a -$60 payment amount. This -$60 payment amount cancels out the initial $60 partial payment.
6. With this Process 1 done, we will now move to Process 2.
6. With this Process 1 done, we will now move to Process 2.
PROCESS 2 - Re-creating the charges to send a new invoice
Process 2 will involve re-creating the charges in the original invoice so that I can re-send the charges to the Debtor Account and apply the correct payment type. (MasterCard instead of Bank Transfer in my example).
There will be a new invoice number after Process 2 is done, do note this to your debtor for their reference.
As your debtor will continue to refer to this new invoice, you will need to re-create the charges with appropriate Description & Print Dates matching the original invoice.
You can still use the bulk amount method to avoid creating a room charge one by one if your invoice is too long. You will need to note the Stay Dates in the Description when you do this method.
1. Proceed back to the original reservation to start posting the charges again. The revenue charges will be a positive amount this time.
Process 2 is very time-consuming and prone to manual error, please allow sufficient time to complete this step depending on how many transactions are in your original invoice.
2. Select your revenue charge, fill out the Description (copy paste the original Description of the transaction line) and match the Print Date to the original transaction line.
Input a positive amount.
2. Select your revenue charge, fill out the Description (copy paste the original Description of the transaction line) and match the Print Date to the original transaction line.
Input a positive amount.
TIP TO MAKE THIS STEP FASTER
You can skip filling out the Description and Print Date and just fill these out once you are done with your postings.
You will just need to keep track of how many charges you have posted.
You can skip filling out the Description and Print Date and just fill these out once you are done with your postings.
You will just need to keep track of how many charges you have posted.
3. When done with posting your revenue charges, you should have new transaction lines mirroring the charges of the original invoice like below.
4. Proceed to send your new charges to the same Debtor Account. It will be in the current transactions tab as an unpaid invoice with a new invoice number (#45).
5. Again, with my example above, I initially applied the wrong payment type for my partial payment for original invoice #41. (Instead of Bank Transfer, I should have used MasterCard)
I can now apply the correct partial payment type of $60 to the new invoice and re-send the invoice to my debtor as a reflection of the new outstanding balance after the partial payment.
When corresponding with your debtor, let them know to disregard the old invoice number (#41) and refer to the current invoice number #45.
Related Articles
Current & Past Transactions
Current & Past Transactions Quick Answer: This article covers the Current Transactions & Past Transactions tab of a debtor account in GuestPoint. The Current Transactions tab relates to outstanding invoices for a debtor account, while the Past ...Debtor Payment Invoice Reversal for a Paid Invoice in Past Transactions
Quick Answer: This article covers debtor invoice payment reversals in GuestPoint. This is a manual procedure to reverse & re-create an invoice sitting in the Past Transactions tab of a Debtor Account. When an outstanding invoice in the Current ...Daily & Payment Summary
Daily & Payment Summary The information listed in this area is a running total since the last Roll Over. This provides useful information breaking down each revenue account and payment type. A quick way to see if breakfast charges have been posted is ...Send Debtors Statements
Send Debtors Statements Quick Answer: Go to Management → Daily Tasks → Send Debtors Statements. Select companies and choose Email or Print. To send your monthly statements to debtors, click ‘Send Debtors Statements’. Just like the ‘Send Statement’ ...Introduction to the Accounts Tab
Introduction to the Accounts Tab Quick Answer: This article covers introduction to the accounts tab in GuestPoint. The Accounts tab is the place to get financial information and where you can manage your Debtors and Non- Residential Accounts. There ...